How to Clear Cache in Premiere Pro in 2 Steps
Clearing cache in Premiere Pro has become an essential step in my editing The process of selecting, arranging, and assembling the visual and audio components of a film to tell a coherent and compelling story. workflow to ensure the software runs smoothly. Over time, Premiere Pro accumulates cache files to speed up the editing process, but these files can clog up the system, leading to sluggish performance. I’ve found that by regularly purging these temporary files, I can keep my system snappy and responsive, which is vital when I’m knee-deep in editing projects.

I’ve learned that handling cache files isn’t as daunting as it might seem. In Premiere Pro, the program stores various types of cache files, including preview renders and conformed audio files, to make real-time playback possible. However, when these files are no longer needed, they can be safely cleared out. My routine now includes clearing the cache to avoid unnecessary storage space being taken up, and to sidestep any potential system conflicts that could interrupt my editing flow.
Using Cache Files in Premiere Pro
Before diving into the nitty-gritty, it’s crucial to grasp what cache files are and how they’re the backbone of smooth performance in Premiere Pro. These hidden helpers streamline your editing process, but when they pile up, they can cause more harm than good.
Types of Cache Files
- Media Cache Files: These include .cfa files and .pek files which are generated by Premiere Pro to make playback and scrubbing smoother.
- .IMS Files: These are thumbnail cache files that Premiere uses.
- Media Cache Database: This is where the whereabouts of all cache files are stored.
How Cache Enhances Performance
Cache files are like shortcuts to heavy lifting. When I work on a project, these files:
- Allow quicker access to audio waveforms (hello, peak files) and video frames.
- Save time by storing processed media so that I don’t have to render it every time I preview it.
Common Issues with Cache
Despite their usefulness, cache files do have a dark side:
- Unused Media Cache Files can clutter up my system, taking up precious space.
- An overstuffed cache can lead to errors and sluggish performance.
- Sometimes, if there’s corrupt data in the cache, I might run into unexpected crashes or errors during playback.
Keep in mind that cache files aren’t permanent and should be cleared periodically as part of routine troubleshooting and maintenance of Premiere Pro.
How to Clear Cache in Premiere Pro
Clearing the cache in Premiere Pro is essential to reclaim storage and keep the editing process smooth. I’ll walk you through two methods: using Premiere Pro’s built-in options and manually deleting cache files.
Step-by-Step: Deleting Cache Via Premiere Pro
First things first, I need to make sure Premiere Pro is open. Here’s how I delete cache files within the software:
- In Preferences:
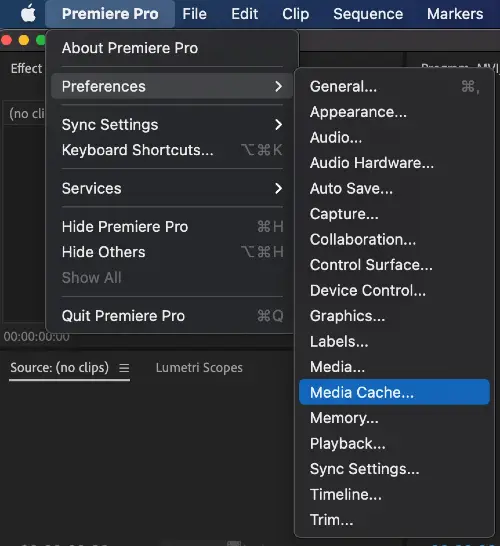
- I go to Edit > Preferences > Media Cache on Windows or Premiere Pro > Preferences > Media Cache on Mac.
- Then, I simply click the Delete button.
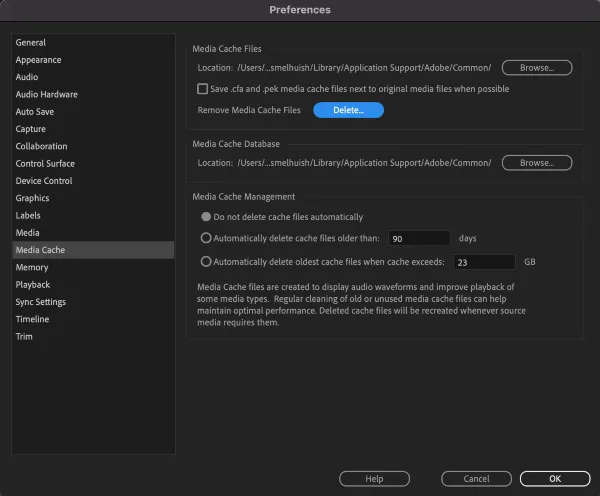
- Choosing What to Delete:
- All Media Cache Files: To free up the most space, I select Delete All Media Cache Files. This option removes all the cache files associated with the media in all my projects.
- Unused Media Cache Data: If I only want to delete cache files not in use by the current project, I pick this less aggressive option.
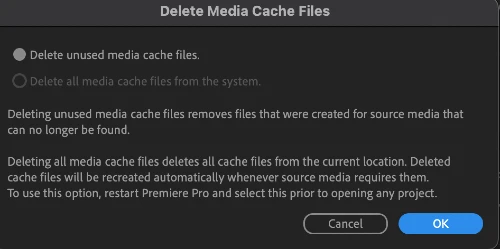
Remember, it’s prudent to close all projects if I opt to clean all media cache files to prevent any hiccups.
Manual Deletion of Cache Files
Sometimes, I prefer to roll up my sleeves and delete the cache files manually. This is how I do it:
- Locating the Cache Folder:
- The Media Cache generally lives in a dedicated folder that I can locate in the Cache Settings in Premiere Pro’s preferences.
- Navigating to the Folder:
- After jotting down the cache folder’s location, I head there using Windows Explorer or Finder on Mac.
- Removing the Files:
- Once there, I select all files and folders within the Media Cache folder and delete them. A quick tip: ensure Premiere Pro is closed before doing this to avoid any potential issues.
Deleting cache this way is a bit more hands-on, but it gives me full control over what’s being removed from my system.
Optimizing Premiere Pro Settings for Cache Management
When I’m editing in Premiere Pro, managing my cache smartly ensures I’m getting the best performance out of the software. I like to fine-tune where my cache is stored and how much space it’s allowed to take up, plus I set the program to automatically clear out cache data that’s no longer needed.
Adjusting Cache Location and Size
The first thing I tend to do is adjust where my media cache files are stored:
- Preferences: In Windows, I go to Edit > Preferences > Media Cache . On Mac, it’s Premiere Pro > Preferences > Media Cache .
- Cache Location: I change the location of the media cache to a secondary SSD drive to keep my main drive free. Choosing an NVMe drive, if available, can speed up read/write tasks for cache.
- Maximum Disk Cache Size: I also set a limit for the maximum disk cache size to allocate only as much space as I can afford to spare on my drive, ensuring that my hard drive doesn’t get filled up with cache files unnecessarily. This limit can be found under the Media Cache Management options.
Automatic Cache Deletion Settings
I like to keep my workspace tidy, and that includes my cache:
- Automatic Deletion: Under the Media Cache Management options, I find the settings to automatically delete cache files. Premiere Pro can be set to clear out cache files older than a certain age, such as after 90 days, which can free up disk space without my constant oversight.
- Do Not Delete Cache Files Automatically: If I’m juggling multiple projects and don’t want Premiere Pro to delete cache files automatically, I untick this box to handle cache deletion manually. This gives me control over when to clean the cache, but I have to remember to clean it up myself from time to time.
Troubleshooting and Maintenance Tips
When I’m working with Premiere Pro and I hit A precise moment in the script or performance where an action, line, or effect occurs, often used to emphasize timing. a snag, the first thing I look to is clearing the cache. This often helps fix weird errors, delays, and performance issues when playing back video or audio. Clearing cache can sometimes even resolve corrupt project files.
Here’s my go-to checklist for keeping things running smoothly:
- Rebuild the Media Cache:
- For bizarre errors and playback glitches, I navigate to Edit >Preferences >Media Cache on my PC or Premiere Pro >Preferences >Media Cache on my Mac.
- I then click on Delete and choose to delete all or delete unused media cache files to purge old data.
- Restarting Premiere Pro:
- It sounds simple, but before I dive into the cache, I often just try a good old restart of Premiere Pro. It’s surprising how often this fixes things.
- Check Your Hard Drive:
- I make sure my hard drive, better yet, an SSD, has plenty of space. Performance often suffers if the drive is nearly full.
- Deletion of Conformed Audio and Media Cache Database:
- If I’m dealing with audio delays, removing the conformed audio files can do wonders. They’ll rebuild automatically next time I open the project.
- Purge Accelerator Files:
- Stuck on exports? I clean out the accelerator files occasionally for a performance boost.
With large projects, the cache can grow quickly, so I stay vigilant about clean-up.
Oh, and I always double-check I’ve got the latest version of Premiere Pro and my operating system updates. That alone can save me a headache or two!

Related Posts
- How to Download Adobe Premiere Pro for Free
- Why Does Premiere Pro Say Media Offline? [SOLUTION]
- How to Add Black Bars in Premiere Pro in 8 Steps
